Determining the repeatability of different measurement methods in additive manufacturing
What awaits you here: INTRODUCTION MICROGRAPH COMPUTERTOMOGRAPHY (CT) AUTOMATED DENSITY DETERMINATION CONCLUSION Introduction In additive...

In a practical test, Dimensionics Density GmbH and Arburg GmbH & Co. KG investigated the use of fully automated density measurement in the MIM process. The aim was to analyse the influence of production parameters on the density distribution in the green parts and their effects on the shrinkage behaviour during sintering.
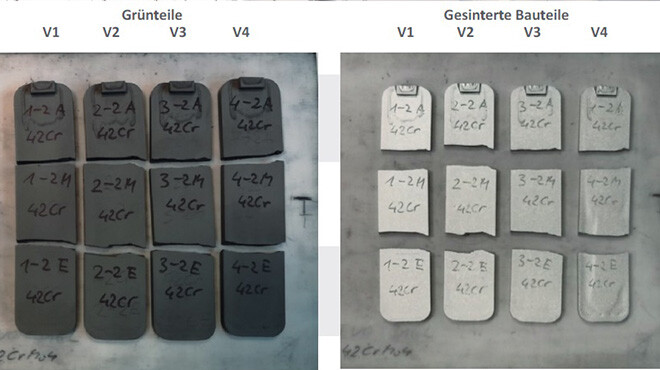
For the test, test plates were produced from a MIM feedstock (Catamold 42CrMo4) from BASF SE. These plates were produced on an Arburg Allrounder 370 S 700-70 injection moulding machine. Two series of tests were carried out in which different injection parameters such as injection speed and holding pressure were varied.

The test panels were divided into three segments of equal length: Sprue, component centre and flow path end. The density and shrinkage of these segments were analysed both in the green state and after sintering..

The Archimedean density measurement of the green parts showed that the density increases with higher holding pressure. Interestingly, the density increased over the component length from the sprue to the end of the flow path, which could be attributed to effects such as inertia during injection or temperature gradients. Further investigations should explore these observations in more detail.

In addition, the geometric shrinkage of the sintered segments was measured. It was found that a higher green compact density led to lower shrinkage. This allowed a prediction of the shrinkage behaviour to be made based on the green part density.

The test made it clear that fully automated density measurement allows conclusions to be drawn about shrinkage behaviour even before sintering. This enables targeted adjustment of the production parameters in order to achieve a uniform density distribution and thus dimensionally accurate end products.
The reduction in rejects and the avoidance of costly test sintering lead to more efficient and cost-effective production. Particularly noteworthy is the ability to precisely detect even small differences in density within a component and optimise the process accordingly.
The practical test has shown that fully automated density measurement using the MIM process is a valuable method for process optimisation. By recognising density differences at an early stage, production processes can be designed in a resource-saving and economical way.
Future investigations will aim to validate the knowledge gained and further research the influence of density gradients on shrinkage behaviour. The integration of this technology into production lines promises sustainable and efficient production using the MIM process.

What awaits you here: INTRODUCTION MICROGRAPH COMPUTERTOMOGRAPHY (CT) AUTOMATED DENSITY DETERMINATION CONCLUSION Introduction In additive...

Additive manufacturing has established itself as a transformative technology in the manufacturing industry. A crucial aspect for the quality and...

What awaits you here: A TRIP TO KOCHEL AM SEE BACKGROUND TO DENSITY MEASUREMENT IN POWDER MOULDING INFLUENCE ON MOULDING AND QUALITY CHALLENGES AND...